/
MCP Guides
How to submit your app to the ChatGPT directory

OpenAI just released a directory for ChatGPT Apps, effectively allowing any developer to submit their app and get access to more than 800 million users. This post explains everything you need to know to submit your app to this new store, with tips to maximize your chances of getting it approved.
TLDR: The submission process is relatively quick, but includes technical testing and design reviews. The OpenAI team will examine your app in detail, across security, capabilities, and user experience considerations, which means approval is not guaranteed.
Prerequisites
Before going into the details of the submission process, here’s what you'll need to get started:
Basics:
A working app accessible on a remote HTTP MCP server
An OpenAI Platform account with Business Verification
Legal information:
Publicly available Terms and Conditions for your app
Publicly available Privacy Policy for your app
A page or email for user support requests
A video demo of the app's capabilities
Technical verifications:
Access to your app backend to to place a domain verification token into
/.well-known/openai-apps-challengeA test account if your app requires authentication
Tool Annations for each of your MCP server tools
5 positive and 3 negative test cases for your app, allowing OpenAI to perform app evaluation
Design & branding
A logo in dark and light modes
3+ screenshots of your app that will be used to illustrate your app in the directory
In addition to these requirements, your app needs to respect OpenAI's UI guidelines and UX principles, as well as its instructions on what makes a great ChatGPT App. We assume you already have a well-designed ChatGPT app here. If not, you can use Skybridge, our full-stack ChatGPT Apps framework, to build one.
Once you have all this ready, go to the app submission section inside your OpenAI Platform account.
Step-by-step process
Step 1: app information
On the first page, you will need to provide the app’s basic information.
Logo icon: 64×64 px, with optional light and dark mode versions
App Name: as it will be shown in the directory AND how users will invoke it using
@yourAppName. Keep this as short as possible.App subtitle: a one-liner describing your app that will be shown in the directory. Keep it brief and concise.

App Description: a longer text that will be visible on the app's dedicated page

Category: choose in which section your app will be shown, from among Business | Collaboration | Design | Developer Tools | Education | Entertainment | Finance | Food | Lifestyle | Productivity | Shopping | Travel
Developer name: he developer name that will appear on the app details page
Website URL: your app’s website URL
Privacy policy URL: a publicly available URL explaining, at minimum, the categories of personal data collected, purposes of use, categories of recipients, and user controls
Terms of service URL: see the guidelines for more details, as this depends on your business
Video demo: keep it short but showcase your app’s full capabilities, with visuals on all platforms (web, Android, iOS)
App commerce and purchasing: OpenAI currently only allows apps selling physical goods. Payments for digital goods, services, or subscriptions are not yet available. Also make sure your app doesn’t sell any prohibited products.
Step 2: validate your MCP server
You will need to provide a production-ready version of your MCP server, hosted remotely. If authentication is required, it must be OAuth. OpenAI will run a scanning tool on your MCP server to list all exposed tools. For each tool, you will need to justify every Tool Annotation used:
readOnlyHint: is the tool read-only, or does it modify its environment?
openWorldHint: does the tool interact with external entities (e.g., web search, public GitHub PRs)?
destructiveHint: does the tool perform destructive actions, such as editing a database?
Note that for each tool, you must configure the annotations on your MCP server backend, not just justify them.
OpenAI requires you to add a custom-generated token in your MCP server /.well-known/openai-apps-challenge. Once added, click Verify Domain to complete the process.
Step 3: provide testing credentials & test cases
If your app requires authentication, you must provide a test account so OpenAI can access and test your app.
You will also need to submit 5 positive and 3 negative test cases.
For positive test cases, each case should include a scenario describing the general use case (for example, “Research Flights”), the exact user prompt to be tested, the tool that is expected to be triggered (using the exact MCP tool name), and the expected output in the same format your server returns, usually JSON.
Negative test cases should describe prompts that are related to your app’s domain but fall outside its scope. For instance, for a flight booking app, negative prompts could include “Find me good hotels in Tokyo” or “Check the baggage policy for American Airlines.” For each negative case, provide both the scenario and the exact prompt OpenAI should use.
Step 4: add app screenshots
Next, you will need to provide screenshots of your app that will be shown in its presentation page. You can include up to 4 screenshots, but only the first 3 will show in the main frame.
The first screenshot will be used in the “featured” section of the directory if your app is selected.
Do NOT include ChatGPT prompts in your screenshots. OpenAI will add them on top of the screenshots according to what you provide in the example user message field.
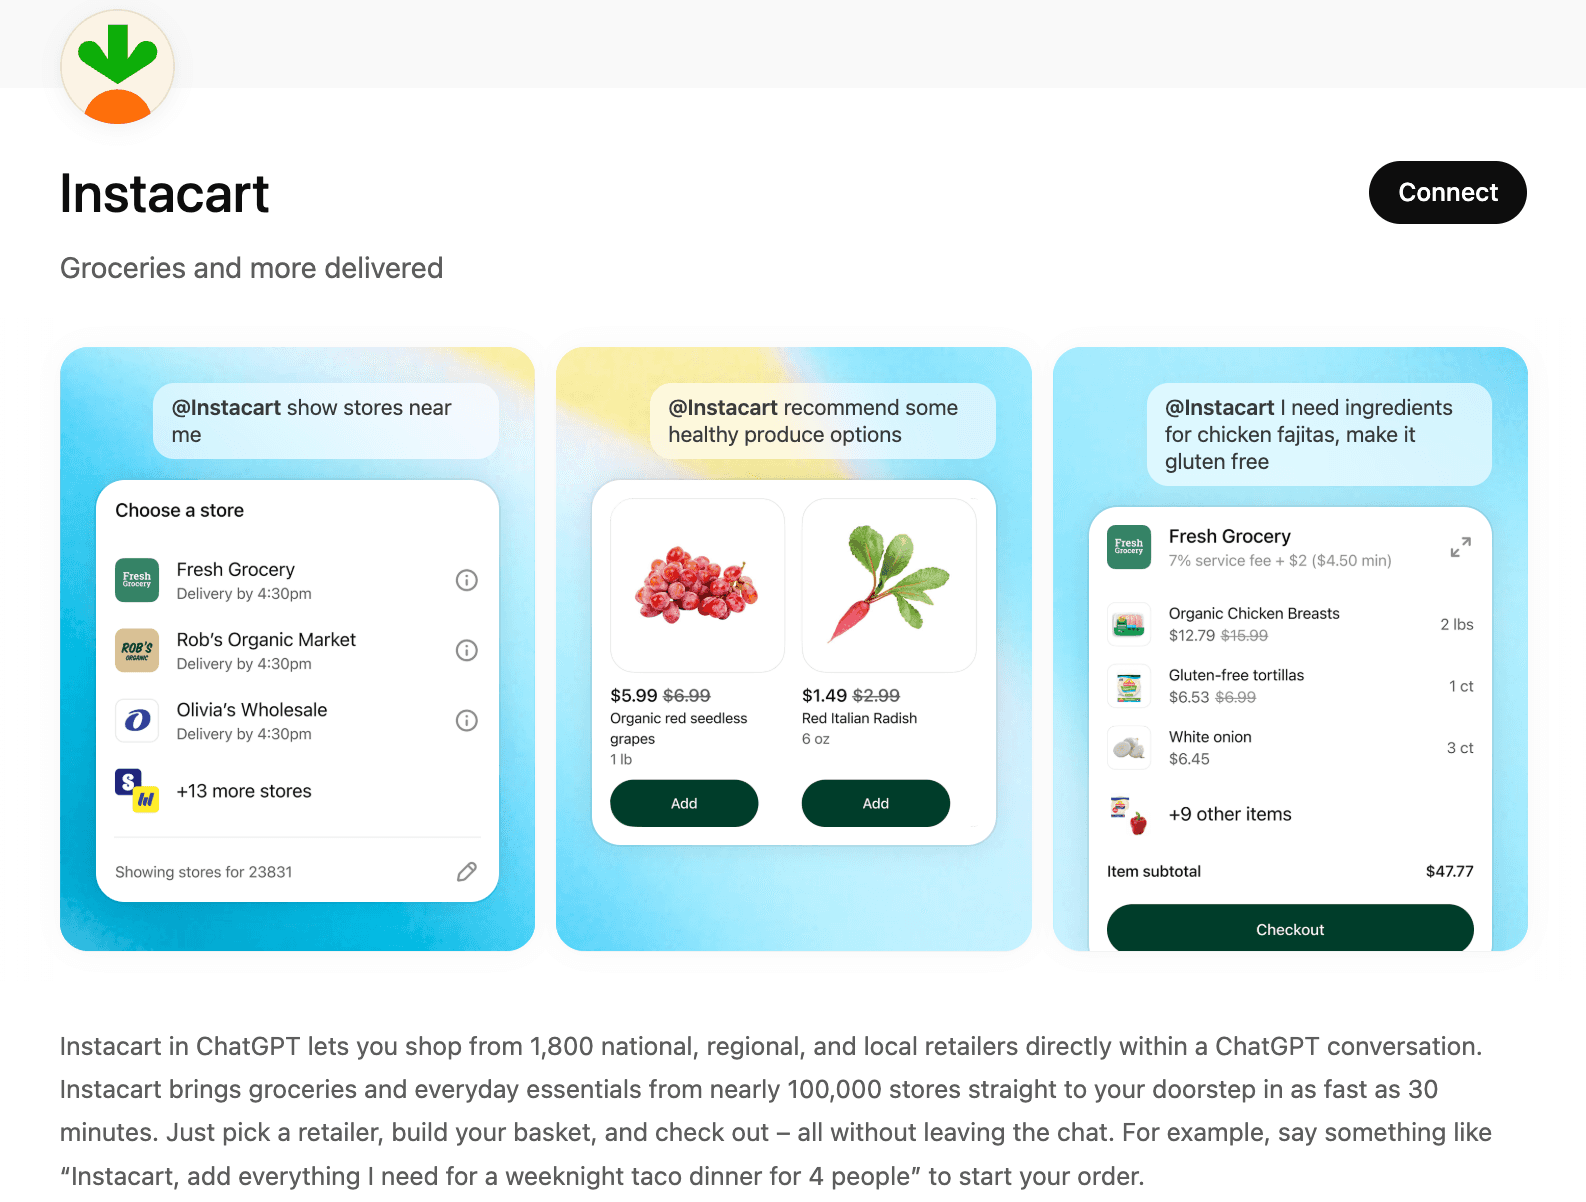
Instacart App presentation page

Step 5: add multi-language / country support
In this step, you can add translations for your app name and subtitle in non-English languages. Note that English is mandatory for your app.
You can also specify where your app should be available by defining either an allowlist or a blocklist of countries. Use international country codes to add or remove countries from your list.
Step 6: submit your application
Your almost there!
Before submitting, add release notes for your app. These will be publicly visible and useful when releasing future versions.
Lastly, you need to agree to OpenAI’s terms and guidelines. A few points to note:
Your app must not include ads.
Your app must not initiate money or crypto transfers.
You need a verified OpenAI Business account (verification can take time).
Additional checks may apply if your app is designed for or marketed to children under 13
With all this filled in, you're ready to submit your app! If you're not ready, a draft of your application is saved automatically and can be accessed at:
https://platform.openai.com/apps-manage/.
While there are a few steps involved in submitting a ChatGPT app, getting into the App Store early comes with clear advantages in visibility and adoption. If you haven’t built your app yet, you can get started quickly using our template and the Skybridge framework, and host it on Alpic to be production-ready from day one!
Liked what you read here?
Get our newsletter!